Introduction
In the design of large buildings, careful attention must be paid to how air moves throughout the interior spaces. In order to prevent stagnant air and to provide sufficient heating and cooling, air must flow to all areas of the buildings. One way to make sure that a building has sufficient air flow is to simply put in more capacity than necessary and then turn the fans on high. Turning the HVAC fans on blast is not a good solution for at least two reasons. First, it is harder to control the indoor temperature, and second it is wastes a lot of energy.
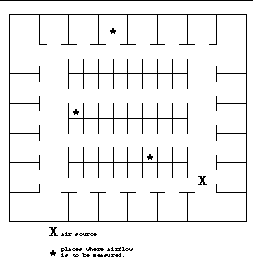
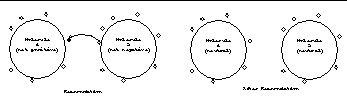
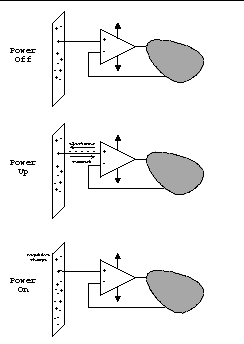
It is very hard to engineer efficient systems without having a quantitative way to measure their performance. Airflow in buildings is currently measured using a tracer gas. Suppose that we want to measure the airflow in an office such as the one shown in figure 1. There is a single duct that supplies air in the lower right corner (X in the diagram) and we are interested in how much air gets from the duct to various offices (* in the diagram).
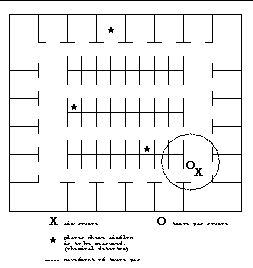
Conventional airflow measurement systems consist of two parts. The first is a device which releases a tracer gas (typically Silicon HexaFloride, SiF6) at a known rate. Chemical detectors are placed in the airflow locations of interest, and then the tracer gas is released. After a predetermined amount of time, the level of the gas at the chemical detectors is read. Figure 2 schematically illustrates how a tracer gas system works. The O represents the source of the gas and the *'s represent the locations where the chemical detectors are placed.
Using tracer gas has two drawbacks. First, it is very expensive because of the exotic equipment and setup labor that are necessary. Additionally, measuring airflow with a tracer gas only gives you data about the airflow at one particular time on one particular day. Day to day airflow when the office is actually occupied must be guessed at.
We envision a system that will replace the expensive SiF6 gas with free airborne ions and replace the expensive chemical sensors with cheap electronics. In our system, one would plug in cheap ion generators at various places around the office. These ion generators would have the same size and shape as the "wall wort" power supplies used for many consumer electronics such as answering machines and Dustbusters. Similarly, there would be "wall-wort" sized receivers that were capable of detecting the ions that were released from the ion generators.
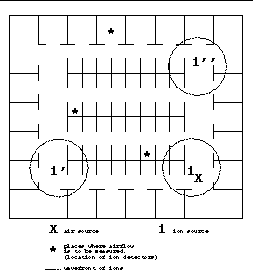
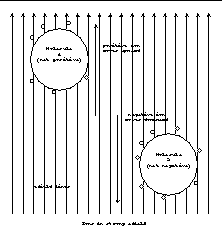
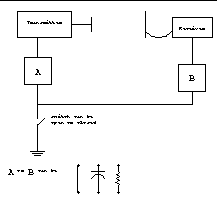
Both the transmitters and the receivers would communicate via a power line modem to a central command unit which would coordinate their various actions. Figure 3 shows how such a system might work. The central command unit would instruct one of the transmitters to turn on (such as i). Then it would gather information from the various receivers (marked with *) on how many ions were being detected. The central command unit could also turn on other transmitters (i' and i'') and again ask what the receivers were detecting. Using this information, the central command unit could then extrapolate the airflow. This process could be repeated without human intervention, and the system could collect data on airflow over time. The airflow information could be used to fine tune the ventilation system of the building.
Of course, the hard part of this system is making the transmitter and receiver packages that plug into the wall. It was not at all clear at the beginning of the project that it was even feasible to measure airflow using ions in the first place, let alone construct a system based on this concept. The purpose of this Advanced Undergraduate Project (AUP) is to determine if such a system could be built.
Transmitter Design
Introduction
Knowing the basics of ion formation in the presence of an electric field, we needed to design an ion generator capable of generating sufficient ions to measure. Instead of trying to start from scratch, we opted to modify a commercial kit.
Electronic enthusiast "Ion Generator" kits can be purchased for around sixty dollars, and the IG7 kit from Ramsey Electronics was selected as the core of our generator. In its recommended configuration (figure 8), the IG7 has several nails which are each very close to a grounded copper tube. The nails are held at high negative voltage (around -7500 volts) by a monolithic high voltage transformer which produces quite a few ions.
Negative 7500 volts means that positive ions are attracted towards the negative nails and negative ions are repelled away from the nails. As the IG7 manual notes, the negative ions are also attracted to the grounded copper tubes, and so very few ions actually leave the IG7's immediate area. The copper tubes are attractive targets for the negative ions because the tubes (via ground) provide a destination to dump excess electrons. As the ions flow towards the tube, they hit other molecules in the air, and so much bumping occurs that there is a noticeable "wind" that flows out of the copper tubes. A lovely blue corona discharge is also visible at the tip of each nail as the molecules are being ripped apart.
Modifications to IG7
To measure airflow we need something to measure. Since most of the ions generated by the IG7 end up reassociating (by design) there are few left to measure airflow with. We wanted the transmitter to generate the largest number of ions possible so that we had the greatest number of ions to measure airflow with. We found that the IG7 generated fewer ions with more nails, so we modified the IG7 so that there was only a single nail (figure 9).
.
Adding Wind with a DC Fan
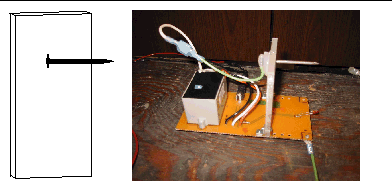
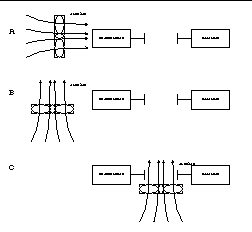
Since we were interested in how ionic current varied as a function of air flow, we also needed some way to vary the airflow. To control the airflow, we set up a DC fan directly behind the transmitter. Controlling the speed of a DC fan speed is very easy -- its speed is a linear function of the applied voltage. To ensure that any differences that we measured with our receiver were really due to airflow (and not to some phenomenon induced by powering the fan) we could change the fan's direction. By blowing air over the transmitter towards the receiver (figure 10.A) we hoped we would see a difference at the receiver. By rotating the fan ninety degrees, we could keep the fan powered in the same general area and not affect (by much) the air flowing from the transmitter and the receiver (figure 10.B). Finally, by aiming the fan perpendicular to the airflow that we hoped to measure (figure 10.C), we could blow ions away from the receiver, decreasing airflow.
System Overview
We hoped that the ions will flow from the transmitter to our detector. A flow of ions is a flow of charged particles, and a flow of charged particles is a current which we could measure. To reduce noise, the transmitter was pulsed at a given rate and we looked for that pulse with the receiver.
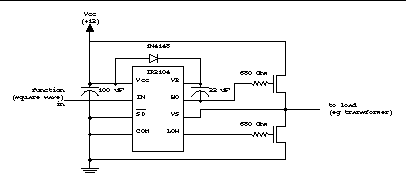
The IG7 kit was originally powered by a 12 DC power supply. To pulse the IG7, we simply hooked the original kit to a pulsed power supply of our own design. The block diagram in figure 11 shows the overall structure of the transmitter. A function generator is used to create pulses which drive a push-pull stage. The push-pull stage actually powers the high voltage transformer on the IG7, which drives the nail up to -7500 volts.
Function generator
To generate a square wave with controllable frequency to drive the nail, a monolithic function generator chip (the IR2204) was selected. By choosing appropriate resistor and capacitor values the period of the square wave output can be controlled. The equation that governs the frequency of the square wave is the standard RC circuit time constant:
The target frequency range is on the order of 0.1 to 1 hertz. Therefore, we chose a 100 microfarad capacitor and a 100 kilo-ohm potentiometer to allow the transmitter frequency to be set in the desired range. Figure 12 shows how the chip was wired.
Push-Pull Stage
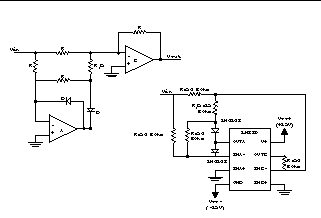
Even though the high voltage transformer that powers up the nail does not draw a huge amount of power, it does require more power than the output of the function generator can provide. Therefore, the output of the function generator was connected to the transformer via a push-pull stage. A push-pull stage consists of two MOSFETs capable of driving the transformer. Figure 13 shows the setup of the push-pull stage that is used to drive a circuit load (In our setup, the load is the high voltage transformer).
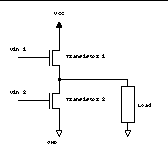
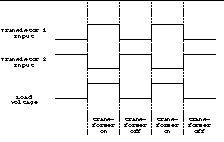
The two MOSFETs in a push-pull stage are used as switches. Each MOSFET (transistor) has a gate (left), a drain (top), and a source (bottom). By placing sufficient voltage on the gate, the drain and the source are electrically connected and the switch is "closed." Removing the voltage from the gate disconnects the drain and the source. When transistor 1 is turned on (by putting voltage Vin 1 on its gate), transistor two is turned off (by putting ~ zero volts Vin 2 on its gate). This connects the supply (VCC) to the load through transistor 1, which allows the load to happily draw power from the source to do whatever it is that it does. When transistor 1 is turned on, the transformer is powered up and it brings the nail to -7500 volts.
Similarly, when transistor 1 is turned off, transistor 2 is turned on and both terminals of the load are grounded turning it off. The astute reader might wonder why you can't simply disconnect the load from the power supply -- isn't connecting it to ground redundant? The short answer is no. The longer answer is that the load might have some inductance or capacitance, and so even though you "disconnect" it from the supply, it could still have energy stored in it that needs to be safely discharged.
Therefore, we implemented a push-pull stage to drive the high voltage transformer on our generator. The only tricky part of using a push-pull stage is that when transistor 1 is on transistor 2 must be off, and when transistor 2 is on transistor 1 must be off. If both transistors were on at the same time, the power supply would be connected directly to ground via the two transistors. Connecting the power supply to the ground is a swell way to make toast. Similarly, turning off both transistors at the same time doesn't allow the load to safely discharge any stored energy.
We only have one signal from the function generator chip with which to drive one of the transistors. We need the inverse of the signal to drive the second transistor. Figure 14 shows how the two transistors must be controlled to safely turn the transformer on and off. As is often the case in electronics, there was a monolithic IC that performs exactly this task. The IR2104 diametrically drives two transistors in a push-pull configuration. The full circuit schematic for push-pull stage in our transmitter is shown in figure 15.
Generating Positive Ions
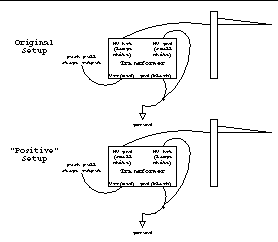
The transformer in the IG7 kit has a transformer which generates very large negative voltages, which in turn creates negative ions. Positive ions probably have different properties than negative ones, so they might be better airflow detectors. We tried to generate positive ions by modifying the IG7 to produce a large positive voltage on the nail. Figure 16 illustrates our modification to the kit: we just swapped the high voltage wires coming from the transformer. However, when the wires were swapped, no voltage at all was produced that we could detect. We assumed that nothing happened because the transformer did not like being wired up backwards. Since it is literally a black box, we don't know what its internal connections look like, and so there could be some electrical reason that nothing happens. Therefore, we don't know what the properties of positive ions are, and this is an area that deserves further study.
Receiver Design
Initial Receiver
The whole point of this project was to test the feasibility of detecting airflow using ions. Our initial receiver design was very simple because it didn't make sense to spend a long time making a clever detector circuit to detect something that a higher power says can not be detected. Initially, we just turned on the ion generator (no pulsing) and tried to detect some small current into our receiver. We used the modified integrator shown in Figure 17.
Common Ground, System Ground (and Why They Are Different)
Early on we thought about how to provide an electrical path from the transmitter to the receiver. In order to induce an ionic current, we needed ions to flow from the transmitter to the receiver, and thus we had to provide a path for the extra electrons to return to the transmitter. The easiest way to provide a path is to simply connect the grounds of the transmitter and the receiver together.
If we connected both the transmitter and the receiver to earth ground, everything connected to the earth (which includes nearly all large metal objects in a building) becomes an easy path for electrons to return to the transmitter. It is far easier for the ions to go to the earth via a gigantic grounded metal bookcase than to flow through the air, and then force themselves through our detection circuitry.
However, the system that we have in mind consists of autonomous units plugged into various electric outlets in a building. The beauty of the envisioned system is that it is non-intrusive, so you don't have to run wires all over the place. You just plug transmitters and receivers in the wall outlets in various places in the building, and the central control unit takes care of the rest. Since we need an incentive for the ions to travel from transmitter to receivers, we need an electrical path between them as described above. Modern electrical outlets have a common ground wire, and so a common wire is provided to us. However, that common wire is also hooked to the earth which causes the problems described above. The astute reader might suggest that we do something insanely dangerous like using the "hot" wire of the electrical service for our common wire. While this is possible in theory, getting the UL to list a device like that would be rather difficult.
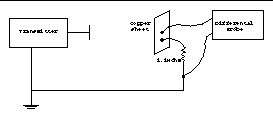
To determine how what effect grounding both systems caused, we set up the test shown in figure 18. We thought that we might be able to partially offset the adverse effects of connecting both the transmitter and the receiver to the earth by connecting to the earth with something other than a wire (such as a resistor or a capacitor).
Differential Probe
One thing that is not obvious about using an oscilloscope to measure voltages is that the ground pin of an oscilloscope probe is actually connected to earth ground. This is a bad thing if you hoping to measure something when it is not connected to the earth because by simply hooking up the scope probe you actually earth ground the system. To make our measurements we used a fancy device called a differential probe which measures the potential difference between two points, not between a point and the ground. The particular differential probe that we used (a Tektronics ADA400A) can also amplify the signal before it reaches the oscilloscope.
Using our initial receiver, we could measure voltage changes that correlated to airflow (see results section for the initial receiver). However, one day we noticed that we could still detect the flow even when our detector circuit had been powered down. At first we attributed this anomaly to some sort of capacitively stored energy that was still powering our circuit. However, even after being off for a day, we were still able to measure a response without powering up the receiver. We (finally) concluded that we had really been measuring ions with the differential probe and not our simple detector circuit.
The differential probe (as other scope probes) is designed to measure voltages without drawing much current. This is exactly the property that we wanted for measuring ionic flows. The differential probe probably contains some fancy instrumentation amplifier to detect voltage while consuming a neglible amount of current. To test the hypothesis that we were measuring the ions with the differential probe, we tried hooking up the differential probe directly to our copper sheet as shown in figure 19.
Increasing Local Airflow (or Using an Ion Hoover)
In our quest to eek out the maximum possible signal from our detector, we also tried mechanical tricks to increase the number of detected ions. We thought that by increasing the amount of air that was moving over our detector's copper sheet antenna we could increase the ionic current through our detector circuitry and measure a larger signal. Figure 20 shows a schematic of the device that we made to test this idea.
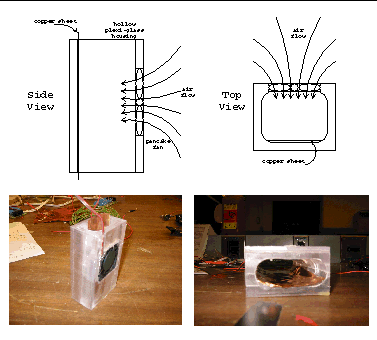
Our ion hoover was a hollow box made out of plexi-glass that is open at both ends with our copper sheet on the inside. A small "pancake" fan was installed in the side of the box to suck air in the side past the copper sheet and then out the ends of the box.
Unfortunately, the ion hoover idea did not seem to work -- it actually decreased the signal that we detected. The decrease could have been from any of a number of causes, such as increasing the turbulence of air around the detector, strange interactions between the plexi-glass and the ions, ions being attracted to the (grounded) metal in the fan, or the copper sheet being differently shaped than the one used in our other experiments. For our purposes it didn't really matter -- the ion hoover didn't increase received signal, so the idea was abandoned.
Receiver Mark II -- Overview
The peak to peak voltage measurements that were made using the initial receiver validated building a more sophisticated one. Making measurements of "peak to peak voltage" is a technical way of saying that the signals were measured by hand on an oscilloscope. Someone can't be sitting around measuring responses by hand in an automated system. To address this concern, a receiver was designed that would output a DC voltage level proportional to the number of ions that are being received. The block diagram of the new receiver is show in figure 21.
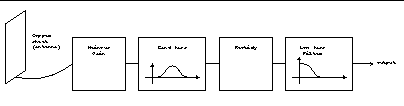
First, ions hit the copper sheet on the left producing a voltage. Since there are very few (relatively speaking) ions, the signal from the copper sheet is very small. Therefore we amplify the signal by a large amount (on the order of 102-104). However, our copper sheet is also an excellent detector of 60 hertz power line noise, which limits the amount we can gain our input signal. To remove the unwanted noise, we put the signal through a bandpass filter centered at the transmission frequency of interest. Since we want a DC level at the output, and our bandpass filter also removed any DC component of our signal, then the signal is rectified and low passed. Figure 22 shows a stylized version of a signal as it passes through the various parts of our receiver.
Gain Stage (Model A)
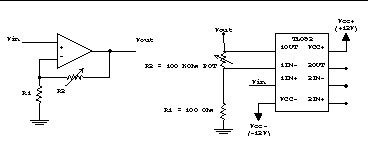
The initial gain stage is responsible for detecting the very (very) small voltage on the copper plate and amplifying it for the rest of the receiver to work with. For this task we initially used a single op-amp as a standard non-inverting amplifier as shown in figure 23. The gain of the amplifier is given by the following equation:
By using a 100 kilo-Ohm variable resistor (potentiometer) for R2 and a 100 Ohm resistor for R1, the initial stage's gain can be set between ~1 and ~100.
Ideally, as ions hit our copper plate, they raise the electric potential and that potential change is what we use to detect air flow. Because there are so few ions flowing onto the plate, we have to take care that we do not consume them to bias our circuitry. Ideally, op-amps do not consume any current on either input. In reality, op-amps require a non zero "input bias current," so we chose an op-amp that has a low input bias current, the TL082, for the initial gain block.
The other feature that we needed the op-amp to have was low noise. As we are trying to measure a ridiculously small signal to start with, if the op-amp added a lot of noise our chances of differentiating between the signal and the noise would be very small
Input Bias Currents (or, Why the Initial Gain Stage Didn't Work)
When the input stage was first powered, it immediately railed negative. Perplexed, we turned on our transmitter to see what was happening. To our surprise, when the transmitter was on (and sending negative ions to the receiver plate) the output of the gain stage actually became less negative. As negative charge was flowing from the transmitter to the receiver, we expected the copper sheet to become more negative. Since the output was already pinned negative, we expected the output to remain pinned negative, which it did not.
The output was railing negative because the input was railing negative. Now, why would the input rail negative when the transmitter was off? The answer lies in the fact that even though we chose an op-amp with a small input bias current, it was still drawing too much. Figure 24 illustrates what was happening. Initially, the copper plate was at zero volts, very happy and content. Then the op-amp was turned on and started drawing current into its input. The copper sheet was forced to source as much positive current as it could, which decreases the sheet's voltage. Eventually the sheet's voltage has been decreased to the negative rail voltage (the most negative voltage in the op-amp) which causes the output to rail negative as well.
When the transmitter was powered up, it somehow induced positive charge on the copper plate, which raised the voltage on the plate and brought the input voltage up from the negative rail. This also brought the output voltage up from the negative rail. Somehow we needed to be able to supply the op-amp with enough input bias current for it not to rail. One possible source of bias current is the earth: a large resistor inserted between the copper plate and ground. While earth grounding the input provides a source of input bias current, it also attenuates the input signal significantly as the resistor forms a voltage divider with the copper sheet.
Gain stage (Model B)
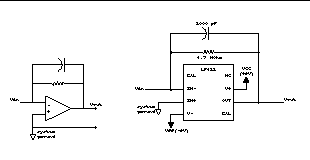
Given the problems of not being able to source enough input bias current for our TL082 op-amp, we tried to remedy the situation using LF411 op amps. The LF411 is a newer chip, with what we thought was a smaller input bias current. Figure 25 shows a schematic of the circuit that we built using LF411.
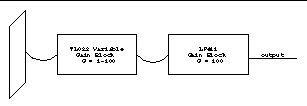
As it turns out, the LF411 requires a larger input bias current at room temperatures than does the TL082. However, building an input stage that used the LF411 was not a total waste: we figured out several things that were important to our final receiver design. First, a gain of 100 was not enough. To have the maximum possible chance of detecting our signal, the initial signal must be immediately gained as much as possible. Gaining the input initially as much as possible means being able to turn up the gain so much that the amplified noise almost rails. To enable such a large gain, we ran the output from the first (variable) amplifier through another gain stage with a fixed gain of 100. Cascading gain stages in this way gave us a 1-104 gain range.
Gain stage (Model C)
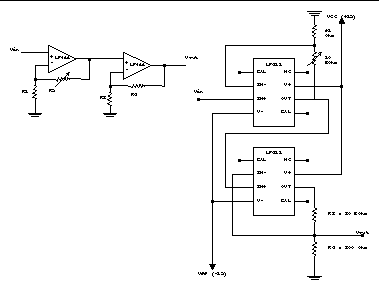
We spent some time investigating using an AD549 ultra low input bias current amplifier. It didn't seem to offer any improvement over the TL082 in our informal tests. As the TL082 is a stock part and the AD549 is an expensive speciality one, we decided to stick with the TL082 as the initial input stage. Therefore, our final receiver has the copper sheet connected to a TL082 1-100 variable gain stage. The output of the initial gain stage is passed through a LF411 based stage with gain of 100. In addition, the input of the initial gain stage is connected to the earth via a 2.1 mega-ohm resistor to supply the needed bias current. Figure 26 shows a schematic of this system.
Bandpass stage
So, now we have a wonderful gain stage that amplifies our tiny signals by a huge factor. However, we have also amplified all the noise on the input by the same huge factor, and in particular we have amplified the 60 hertz noise from the electric utility service. We can use our knowledge of the frequency content of our transmitted signal to get rid of most of the noise by using a bandpass filter centered around our transmission frequency. Since our transmission frequency was variable, we wanted the center frequency of the bandpass filter to be variable as well. When we changed the transmission frequency, we wanted to be able to change the center frequency of the bandpass filter as well. There are numerous designs for bandpass filters in circuit books, but the center frequencies of most circuits is controlled by more than one resistor. The circuit in figure 27 has a center frequency controlled by a single resistor, and so by using a potentiometer we made a tunable bandpass filter.

Note that we do not first bandpass the input from the copper sheet and then send it through a gain stage. Since our bandpass filter attenuates somewhat at its center frequency, if we were to bandpass the original signal we would filter out both the noise and the signal we were interested in.
The following equations govern the center frequency (fr), and the "quality" (Q) value of the bandpass filter (the Q value measures how sharp the frequency response of the filter is). Note that we used a potentiometer for Rr so that we could change the center frequency easily.
rearranging, we can also get Q as a function of Rr
Rectifier stage
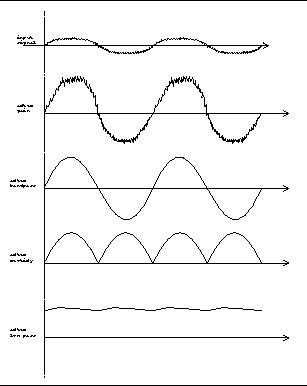
With the final rectifier and lowpass stages we wanted to output a DC voltage that is proportional to the input signal. Eventually we are going to measure this voltage and use it as the input to the control unit. As the bandpass stage actually removes the DC component of the input signal, we rectify the output of the bandpass stage. Rectifying the signal is equivalent to taking its absolute value. Figure 28 demonstrates the effect of a rectifying several example signals.
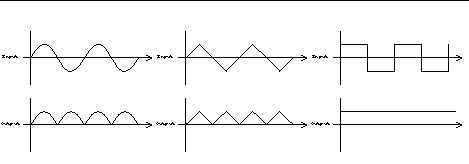
There are two general classes of rectifiers. Passive rectifiers only require a network of diodes, but because diodes induce a voltage drop across them using a passive rectifier means that you lose part of your input signal to the diode drop. There are also precision or active rectifiers which use op-amp feedback to get remove the diode drop. Half-wave rectifiers do not invert negative inputs, they simply output zero volts. Full wave rectifiers, on the other hand, invert negative input signals. If we were to use only a half-wave rectifier, we would be throwing out half of our signal. Therefore, we chose to use the standard, full-wave, precision rectifier circuit found in Horowitz and Hill and shown in figure 29.
.
Low Pass Stage
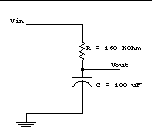
We eventually want our receiver to output a single voltage level proportional to the input signal's strength. This single voltage level will then be read by the central control unit and correlated with airflow. A logical way to measure the "strength" of the rectified signal is by measuring its mean. In signal parlance this means measuring its DC value which can be done easily with a lowpass filter. Just as there are 101 ways to build a band-pass filter, there are equivalently many ways to build a low pass filter. The simplest is a passive RC circuit with the appropriate time constant as shown in figure 30.
How does one determine the "appropriate" time constant? The first thing to do is to look at the frequency content of the signal that we are interested in. We know that we are sending a signal from the transmitter at approximately one hertz. Therefore, we expect that the frequency content of the signal will look something like that shown in figure 31.
We know that the cutoff frequency wc (in radians per second) for an RC circuit is given by 1/RC.
Remembering that frequency f in Hertz (cycles per second) is given by
We see that the cutoff frequency for the low pass filter is equal to
We chose to attenuate all of the frequencies except the DC component by at least 40 decibels (e.g. a factor of 100) so we designed our cutoff frequency to be 0.01 Hertz. We chose a 100 microfarad capacitor (because we had a lot of them), which implied that we should use a resistor with value 159155 ohms (and had a 160 kilo-ohm resistor). It is important to note that the RC time constant of the lowpass filter is 16 seconds, so one has to wait for around 30 seconds for the output to stabilize after making any input changes.
Experimental Results
Initial Receiver -- Basic Results
Our first measurements were made with the initial receiver (which means that they were really made using the differential probe). The initial measurements helped to characterized ion flow and convinced us that making a more complicated receiver was worthwhile.
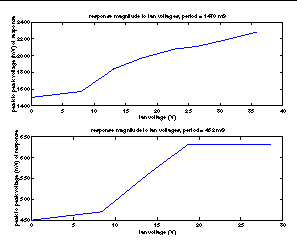
One property that we measured was how the receiver response varies as a function of frequency. To measure the frequency response, we simply set the receiver 1 foot away from the transmitter, varied the period of the transmitter and recorded peak to peak voltage we saw at the receiver. Remembering that period is the inverse of the frequency, figure 32 shows that as the period was increased (frequency decreased) the peak to peak voltage response at the receiver increased.
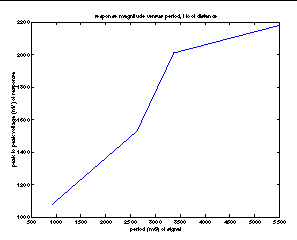
A larger response at lower frequencies is not surprising. If the response at the receiver measures ion flow, the longer you leave the transmitter on, the more ions should build up on the copper sheet, and therefore a greater voltage would be measured. We chose to use a period of 3.3 seconds for the remaining tests.
To test if the voltage on the receiver is a function of airflow (instead of some capacitance) we set the transmitter 2 feet away from the receiver and varied its speed. By varying the fan's speed we were varying the airflow from the transmitter to the receiver. The experiment was conducted twice with two different transmitter periods, as illustrated in figure 33. As the fan voltage was increased, the peak to peak response of our receiver also increased.
One possible criticism of the data in Figure 33 is the method by which we were inducing air to flow from transmitter to receiver. As was discussed above, it could be the case that the receiver is picking up voltages that are attributable to supplying power to the fan and not the airflow caused by the fan. However, when we rotated the fan by ninety degrees (so that it was still powered, but not appreciably affecting airflow from the transmitter to the receiver) the voltage change went away. This leads us to conclude that the changes that we observed were in fact due to changes in airflow.
Initial Receiver -- Distance Measurements
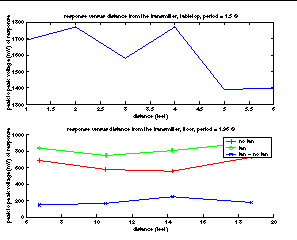
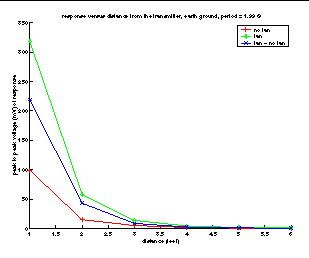
We expected a negative relationship between distance and received signal strength as we expected ions to reassociate mid-flight. Figure 34 shows the results of our initial range tests -- as we moved the receiver farther and farther away from the transmitter, we can seemingly still detect a difference in received voltage at 20 feet from the transmitter. However, the measurements in figure 34 were made when we had a dedicated 20 foot system ground wire run between the transmitter and receiver. As described above, we were interested in the receiver's performance when we used earth ground.
We tested the range with both the transmitter and receiver connected to earth ground. Unfortunately, ions have a tendency to go to ground via other paths than the receiver, and the receiver response seems to be some sort of exponentially decreasing relationship based on distance, as figure 35 demonstrates.
Initial Receiver -- Discharges
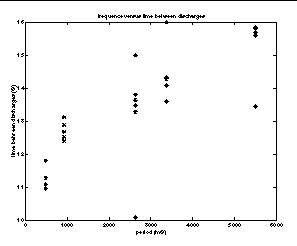
One interesting phenomenon that we observed with the initial receiver was periodic discharges. While we sat and watched the output of the receiver during the range tests, we saw gigantic downward spikes periodically. It seemed as if something was discharging. We thought that this behavior warranted some additional study, so we measured the time between discharges at various transmitter periods. Figure 36 shows the results from these discharge measurements. It is interesting that the time between discharges increases with the period of the transmitted signal.
Receiver Mark II -- Results
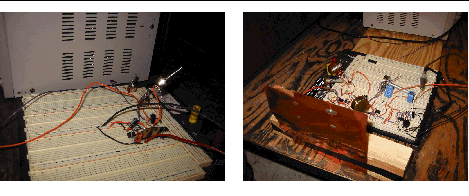
Based on the initial results, the receiver described in this paper was built and tested. Figure 37 shows photographs of the actual setup that we constructed. Both the transmitter and the receiver were mounted on wheeled carts which were could be pushed around the laboratory. The small DC fan from previous experiments was not powerful enough to noticeable affect air flow at longer distances, so we used a large industrial fan (a GE "portable fan", cat no. F13P4: 30 Amps at 110-120 Volts) which was more than capable of generating sufficient air flow on its "low" setting. Turning it any higher resulted in the copper sheet deforming too much (think fluttering flag).
Note: Distances were measured in units of the number of floor tiles between the transmitter and the receiver purely for convenience. Each tile is exactly nine inches square, so we multiplied by 0.75 to convert tiles to feet.
Receiver Mark II -- Measurement Methodology
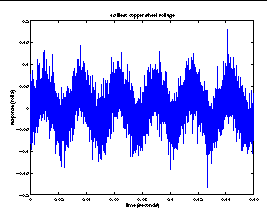
We measured the output of the final lowpass filter in the receiver with a portable digital oscilliscope. Figure 38 is a plot of the input voltage into the receiver. The large waves are 60 hertz power line noise. The size of this noise is what fundamentally limits the maximum gain of the initial receiver stage. To perform our maximum distance tests, we set the gain of the initial gain stage as large as possible without causing the 60 hertz noise to rail.
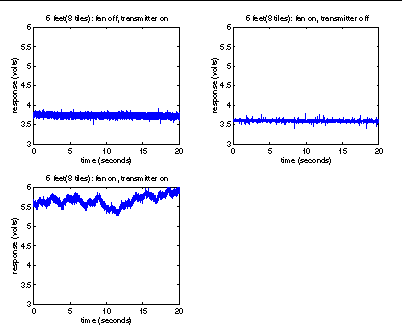
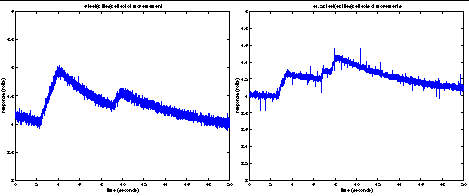
We were primarily interested in two measurements: 1. the voltage coming out of the receiver when the transmitter is on and the fan is off, and 2. the voltage coming out of the receiver when the transmitter is on and the fan is on. If our receiver actually measures airflow using ions, we expect to see a higher voltage when the fan is on compared to when the fan is off. However, we wanted to make sure that the difference in voltage was due to an increased ionic current, and not due to the copper sheet waving about due to the wind (which it did). We set up the receiver and transmitter six feet apart and checked the response of the receiver with the transmitter on and the fan off, with the transmitter off and the fan off, and with the transmitter on and the fan on. As figure 39 demonstrates, only when the transmitter is on does the receiver response increase due to airflow. Therefore, we conclude that we are indeed measuring the air flow using our airborne ions.
Receiver Mark II -- Distance Tests
The primary concern of this AUP is determining the distance at which airflow can be measured. With the receiver mounted on a movable cart, the receiver response was measured at several distances to determine the range of the receiver. Figure 40 shows the results of these measurements.
The response at 6 feet is quite large. Turning on the fan increases the steady state response of the receiver by almost two volts, certainly a strong indication that we are detecting airflow. The cart was then positioned at 10.5 feet away from the transmitter and the response of the receiver was tested again. The response is only slightly larger when the fan is on compared to when it is off, and the difference is roughly the same size as the variance. The 11.25 foot graphs purports to show a larger difference in signals than does the 10.5 data, but that is most probably a measurement error as described below.
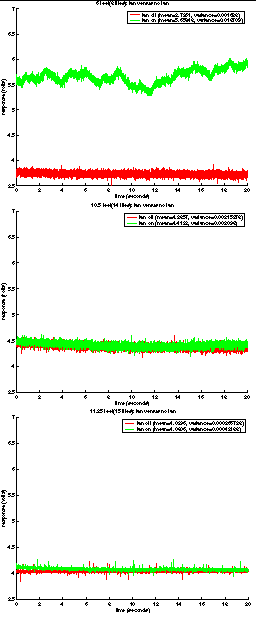
The data from 11.25 feet seems to suggest that the difference in response got larger when the receiver was moved from 10.5 to 11.15 feet from the transmitter. This difference is primarily due to the initial four seconds of the fan response where it is above the no fan response. This initial four seconds is the tail end of the receiver settling out to its steady state value. After we changed the setup, we had to wait for the response to settle down before we took the measurement. We did not wait long enough for the receiver to settle when we took data at 11.25 feet with the fan on, and thus our data is slightly flawed. The reason that the response needed to settle is interesting, and it is described below.
Receiver Mark II -- Measuring Proximity Movement
The response of the receiver has a large time constant because charging or discharging the output capacitor takes a long time. However, when movement occurred near the copper plate, the receiver response increased very rapidly.
Figure 41 demonstrates the effect that movement has on the output of the receiver. The sharp spikes in response represent motion occurring near the receiver. In the graph on the left, the first peak corresponds to someone sitting close to the receiver and standing up suddenly. The second peak is due to an arm reaching out to save the wave form on the oscilloscope. In the graph on the right, we can see three peaks. The first was caused by standing up, the second by reaching for the oscilloscope and the third by sitting back down.
Conclusion
We have analyzed several properties of airborne ions when they are used for airflow measurement, and we have described a receiver that is capable of detecting changes in airflow at ranges of up to 10.5 feet. A more sophisticated initial gain stage might be able to obtain another factor of two performance improvement from the receiver. While a range closer to 50 feet would be instantly usable, 10-20 feet could still yield a realizable airflow measurement system.
The exponential drop off in received signal versus distance implies that there are significant engineering hurdles to accomplish before a commercial product can be brought to market. However, this AUP demonstrates that airflow can be measured using airborne ions that more work should be pursued.
The characterization of the receiver response for local movement should be investigated further as it has potentially interesting applications. Since the receiver's response due to airflow and response due to motion appear to be characterized by different time constants, useful information other than airflow might be obtainable. For example, it might be possible to track human movements and behavior patterns in a cheap and non-intrusive way.
References
Coughlin, Robert F. and Villanucci, Robert S. Introductory Operational Amplifiers and Linear ICs. Prentice Hall: Englewood Cliffs, NJ, 07632: 1990.
Horowitz, Paul and Hill, Winfred. The Art of Electronics. Cambridge University Press: Cambridge UK: 1989.
Kit Assembly and Instruction Manual for IG7 - Ion Generator Kit. Ramsey Electronics Inc: 793 Canning Parkway, Victor, NY, 14564: 2001.
AD549 - Ultralow Input Bias Current Operational Amplifier Spec. Sheet. Analog Devices, One Technology Way, P.O. Box 9106, Norwood, MA, 02062: 2002.
LF411 - Low Offset, Low Drift JFET Operational Amplifier Spec. Sheet. National Semiconductor 2900 Semiconductor Drive, P.O. Box 58090, Santa Clara, CA 95050: 2001.
Linear Circuits: Amplifiers, Comparators, and Special Functions: Data Book Volume 1. Texas Instruments, P.O. Box 809066, Dallas, TX, 75380: 1989.